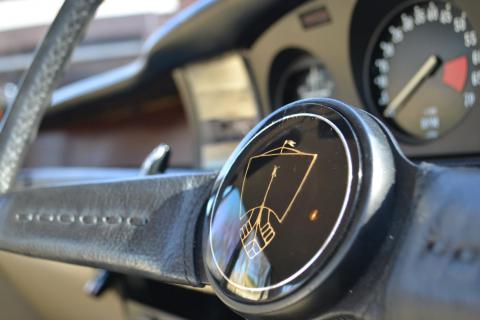
 Regardless of what your P6 looks like or goes like, the thing that makes the biggest difference to driving enjoyment is the way it feels to drive.
Despite being a worm and roller steering box with a complex set of linkages, the P6 manual steering gear offers a smooth, direct and positive steering experience with plenty of feel. A properly set-up steering box gives good feedback that was praised by the motoring press when new. Even today it remains an excellent drive.
However, if neglected, P6 steering is often imprecise and heavy – especially at town speeds – and can be wandering at high speed. Much of this is due to the system’s complexity. Where a normal rack and pinion setup has as few as 2 ball joints, the P6 has 12, and there’s an extra steering idler as well.
In this article, we show you how a little checking and fettling can turn your car back into the sharp sports saloon it should be. Provided the car is rolling before you begin steering, there is no reason why you shouldn’t be able to parallel park a P6 with one hand.
Are all of those ball joints in serviceable condition?
In theory, the MOT test should have picked this up for you, but sadly this isn’t always the case.
Slacken the front road wheel nuts, chock the rear wheels and jack the front of the car under the crossmember. If you are securing the car on axle stands, take great care where you place them. You should only use the factory jacking points if they are known to be good. You don’t want these to rip out of the sills with the car in mid air! Ideally you should place a block of wood beneath the front of the sill where it meets the front wheel arch and place the axle stand beneath that, but again only do this if you know the area to be absolutely solid. Keep the jack under the crossmember at all times. Remove the front road wheels and put the steering roughly in the straight ahead position.
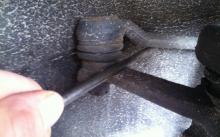
Using a large pry bar, and working from under the front wing, lever at the ball joints to see if you can expose any movement other than the spherical rotational movement they should have. It is worth removing the wings for better access. Move the steering from lock to lock to get better access to the joints on the bell cranks beneath the steering box and idler. If you can get any movement, it’s time for replacement. The side rods and the track rod across the bulk head can be removed with a conventional ball joint splitting tool and replaced by pulling the tapers into engagement with the nut provided (it isn’t a securing nut – the taper is self-securing). The ball joints in the top and bottom of the main suspension upright are interference fits – again the set bolts in the top joint and the circlip in the bottom one have no function in holding the joint in – that’s done by the mechanical interference between joint and pillar. People have been known to grind off this interference to allow joints to slip in easily, if you do this the joint may well come adrift whilst driving – the set bolts and circlip won’t hold them. Removal and refitting requires specialist tools. For that reason, our advice would be to change both joints at the same time and to do it by removing the entire swivel pillar assembly and taking it to a professional. Some of the specialists listed in the advertising sections offer them as exchange with new joints already fitted.
Inspect the steering idler bracket
The securing bolts holding the idler to the steering bracket are known to work loose. This is probably the most common steering defect on a P6 and shows up as imprecise or wandering steering. Tighten them as tightly as you can get them, and ideally use thread-lock.
Adjust the steering box
Manual steering boxes are prone to leaking oil seals at both top and bottom of the box. A common dodge is to replace the lost oil by filling the box with grease. Unsurprisingly this will make your steering much heavier than it should be. Whilst the bottom seal drips oil onto the swivel joints beneath, the top seal leaks into the passenger compartment where it drips down over the brake pedal. Unfortunately the only way of changing these seals is from the inside of the steering box, but providing you have a decent way of working under the car, getting the box out for stripping and reassembling is not as daunting as it appears. The seals are available from any bearing wholesaler.
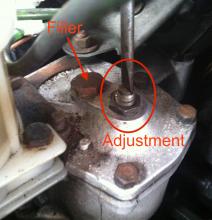
Remove the filler plug on the top of the steering box and ensure it is topped up with EP90 gear oil (use GL4 as GL5 is potentially damaging to the alloys in older vehicles). Do not use anything else and wash out any grease you may find there.
Now wiggle the steering wheel from side to side whilst watching the driver’s side wheel hub to see how far the steering wheel can be turned in each direction before the hub starts to move. This is the backlash or ‘slop’ in your steering. You ideally want to remove as much of this slop as possible.
On the top of the steering box there is a large threaded spindle with two bolts on it. This is the adjuster. Remove the locking nut and slacken the securing nut on the spindle. With a large flat-bladed screwdriver, turn the spindle clockwise by an eighth of a turn at a time. Go back to the steering wheel and check the backlash again. Repeat until there is no more than half an inch of slop at the rim of the steering wheel before the wheel hub moves in either direction. Then turn the wheel from lock to lock to check there are no tight spots.
Now set the two steering stop bolts on the brackets beneath the steering box and idler. These bolts ensure that the steering box doesn’t run up against its limits inside the box at full lock and cause internal damage. Slacken the bolts off and wind them in a bit, then turn the wheel to each full lock in turn. The stop bolts should be wound out until they are just in contact with the steering arm at full lock, then brought out by a further half turn and secured with the locking nuts.
Recheck the steering has no tight spots before checking the securing nut on the steering box is tight. Put the locking nut back on top and tighten it up against the securing nut by turning them against each other with a pair of spanners. Do not simply tighten up the top nut without holding the lower one, as this may move the spindle and upset the steering setting you have just achieved. Turn the steering from lock to lock to check for tight spots again before lowering the car to the ground.
Check your front wheel bearings for play
With the road wheels in place check for movement in any direction other than rotational. The bearings can be tightened if needed with the nut under the grease cap, but it is wise to replace them if their age and condition is unknown. Besides showing up in the steering, worn bearings can also cause ‘pad knock back’ which results in momentary loss of braking as the brake pistons are pushed too far back into the caliper by the run out of the disc knocking against the pads.
Ensure the tyres are evenly inflated.
The factory recommendation for the front tyres is 26 or 28 psi (four-cylinder or V8 respectively) for normal driving and 30 psi for high-speed motoring. Somewhere between these two figures is fine provided both tyres are evenly inflated. 30 psi will be a fraction more economical at speed.
Reposition the wheel on the steering column
After driving the car, you may now find that the steering wheel is no longer on straight. This can be moved on its splines by removing the centre covering and undoing the securing bolt.
Tracking
The P6 is particularly susceptible to errors when setting up the tracking. This is due to the design of the front suspension which creates camber-change in a bump. There aren’t any figures for what the tracking should be in any tyre fitter’s computer, and nor are there any in the Rover manuals. The car predates optical alignment equipment and the figures in the manuals are expressed in fractions of inches at the edge of the tyre tread. Experience with modern equipment shows that P6s work best with the tracking set to zero. But if you are going to have an error, make sure it is towards toe-in. In the language of optical alignment, that is “Zero, Plus Zero, Minus ½ degree”. If you get your tracking set to this on a proper laser optical alignment machine you should minimise the sensitivity of the steering to minor bumps (such as white lines, etc) in the road.
If you prefer to set your tracking the old fashioned way, Gunson’s Tracking Gauge is the easiest way for P6. The beauty of this device is that you don’t actually need to know how much toe in or toe out to apply statically, as the device tests for zero toe dynamically, which is the figure you’re aiming for anyway. You drive the car over the Gunson’s gauge and it gives you a readout via a pointer to show the deviation from zero toe. There is a little bit more to it, but if you are methodical and follow the instructions, you will get it right.
The tracking is adjusted with the threaded sleeve on the tracking bar across the bulkhead, as pictured.
Power Steering or Manual Steering
By following the sections above, you should now have your manual steering optimised and hopefully a transformed experience.
But there are members who find the manual steering too heavy to cope with. The first thing to say is that there are three varieties of manual boxes on P6s. That on the V8 is lower geared than the two four-cylinder boxes, so is the lightest of the lot, but laborious at 4 ½ turns lock-to-lock. On the four-cylinder there are two varieties. All 2000s built up until late 1973 or so have an Adwest box (dome topped). After this date a Burman box (flat topped) was fitted in the majority, but the Adwest box continued to be fitted interchangeably. It’s unclear why Rover commissioned this new Burman box because it is very much heavier to steer than the Adwest original.
So if you need lighter steering and you currently have a Burman steered 2200, the obvious first consideration is to replace it with either the lighter Adwest manual steering box from the original 2000, or a V8 box. All three are interchangeable.
However, if you would simply prefer power steering, it is reasonably easy to retrofit to all models.
The advantage to this option is that power steering boxes are still readily available new, in addition to those salvaged from scrapped vehicles. So swapping in a power steered steering box is a straightforward task. They are a direct swap, and mate up to all of the surrounding components natively, e.g. the steering column, ball joints, bracket mountings, etc. The major difficulty arises with the windscreen wipers. Because the power box is physically larger, cars that have the rod-actuated screen wiper motor on the drivers need to have it replaced with the alternative cable-driven system (shown below) that places the wiper motor on the passenger side. These complete systems can also be obtained from scrapped V8s.
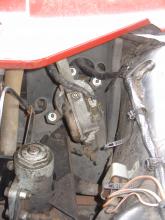
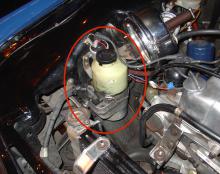
Finally you will need a power steering pump. Member Tony Ryalls has for some years produced kits to fit SD1 2300/2600 pumps to the front driver’s side of the four cylinder engine. We would respectfully suggest that skills of Tony’s calibre are really needed to set this system up properly (shown right). The drive belt runs precariously close to the bottom radiator hose and sorting out the pulley arrangement on the front of the crankshaft is reasonably challenging. A much simpler (and recently discovered) alternative arrangement is fitted to Chairman Mick Burke’s latest P6, a 2000 SC, shown below. It is fitted with the electric power steering pump and reservoir from a year 2000 Vauxhall Astra. You can judge the neatness of this arrangement from the photos. Technical investigation reveals that all manufacturers of modern cars use an electric pump with a peak pressure of 1000psi. This is exactly the same peak pressure as that required by the P6 power steering box. So any electric power steering pump from the late ‘90s through to the late ‘00s will suffice. A brief search on eBay reveals literally hundreds at around the £40 mark.
Interestingly the results with an electric pump are considerably better than using the standard belt driven V8 pump. When manoeuvring in a car park, the engine is generally at, or close to, idling. At this speed a belt driven pump will not deliver anything like that 1000psi, so the amount of power assistance drastically reduced. With an electric pump, the full 1000psi is available all of the time, so the steering is much lighter than a factory power steered V8. On the open road, both systems deliver the same pressure, so the steering feel is identical at speed.
On these grounds we would recommend that people needing to change from manual to power steering use the electric pump method. It may even be worth people with factory power steered cars replacing the factory belt driven pump with an electric pump to gain this advantage.
Provided a separate fuse is employed (especially for series 2 cars, where the fuse box is prone to catching fire if overloaded), all ACR alternator-charged P6 should have no issues running these electric pumps. Cars with dynamos or 11AC alternators may need the system upgrading.
Words: Michael Allen & Chris York
Originally published in Driving Force magazine
February 2014

